Immunizations
The Immunization module is used to record shots given to clients. A client's shot history can be added to provide a complete background. The Immunization module is accessed through the Selected Client screen.
Objectives
After you complete this section, you will be able to:
- Identify the screens in the Immunization Module
- Understand the fields in the Immunization Master
- Add an immunization record
- Change an immunization record
- Add a historical immunization
- Enter Immunization Notes
Immunization Screens
The immunizations module is separated into six screens of immunization information. They include:
- Client_Information_Bar
- Immunization_Master
- Immunization_Services - Add Current
- Immunization Services – Change Current
- Immunization History
- Immunization Notes
Field
Descriptions
Immunization Master Screen
Client Information Bar
Field |
Description |
|
Client Name |
Automatically filled in with the Client's full name displayed at the top of the screen. |
|
DOB |
Automatically filled in with the Client's date of birth displayed at the top of the screen. |
|
Age |
Automatically filled in with the Client's age displayed at the top of the screen in years, months, and days. |
|
Client ID |
Automatically filled in with the Client's TWICES ID. This number is used for troubleshooting purposes. |
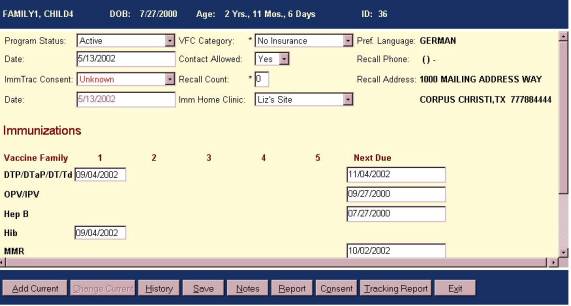
Immunization
Master
The Immunization Master screen consists of two
sections. The upper section
contains information about the client, and the lower section displays an
immunization record for the client.
Following are the fields for the upper section of the Immunization Master.
Field |
Description |
|
Program Status |
Status of the client. Select from a pull-down list. Default for the field is Active. |
|
Date |
Automatically filled in with the date the PROGRAM STATUS is entered or changed. Can be overwritten. |
|
ImmTrac Consent |
Client's agreement or denial to migrate their immunization information to ImmTrac. Defaults to “(Select)”. “(Select)” is not a valid entry, so you will not be able to save the immunization master record until you make another selection. If the selection is “No” or “Unknown”, it will appear in red letters. Select from a pull-down list. |
|
Date |
Automatically filled in with the date the IMMTRAC CONSENT is entered or changed. |
|
VFC Category |
(Required Field) Category for Vaccines for Children. Select from a pull-down list. Defaults to “(Select)” if the immunization master record has not yet been saved. “(Select)” is not a valid entry, so you will receive an error message if you try to save the master without changing the VFC category. |
|
Contact Allowed |
Recall approval. If NO is selected, the client will not be contacted when doing a recall for immunizations. |
|
Recall Count |
(Required Field) Number of times the client will be recalled. Value will default to 0. Can be overwritten but must be > 0. Count will be re-set to “0” if current service (DTP, OPV, Hep, HIB, MMR or Varicella only) given. |
|
Pref. Language |
(Read-Only) Automatically filled in with the client's preferred language. |
|
Recall Phone |
(Read-Only) Automatically filled in with the client's home phone number including prefix and area code. If Contact Allowed is “No”, then the phone will be left blank. |
|
Recall Address |
(Read-Only) Automatically filled in with the client's mailing address. If there is no mailing address, the residential address will be filled in. If no address exists, “No Address Entered” will appear. |
The lower section of the
Immunization Master displays the last ten immunizations for each vaccine or
vaccine family that the client has received. They are listed by immunization family with the immunization
dates and the next due date displayed.
Historical shot records are also displayed on this screen. Double-click on a date, and a window
pops up with more details about that immunization.
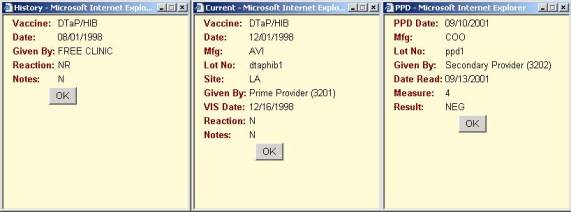
For non-historical shot records,
double-clicking will bring up the following fields:
|
Field |
Description |
|
Vaccine |
Name of the
vaccine type. |
|
Date |
Date the vaccine
was administered. |
|
Mfg. |
Abbreviation of
the manufacturer of the vaccine. |
|
Lot No. |
Lot number from
which the vaccine was administered. |
|
Site |
Abbreviation for
the body site where vaccine was administered. |
|
Given By |
Name and provider
number of the provider who administered the vaccine. |
|
VIS Date |
VIS date of the
vaccine. |
|
Reaction |
Y or N or NR (not
read) |
|
Notes |
Y or N |
For historical shot records,
double-clicking will bring up the following fields:
|
Field |
Description |
|
Vaccine |
Name of the
vaccine type. |
|
Date |
Date the vaccine
was administered. |
|
Given By |
Name of the
provider who administered the vaccine. |
|
Reaction |
Y or N or NR (not
read) |
|
Notes |
Y or N |
For PPD records, double-clicking
will bring up the following fields:
|
Field |
Description |
|
PPD Date |
Date the PPD test
was given. |
|
Mfg |
The manufacturer
of the PPD test. |
|
Lot No |
The lot number
from which the PPD test was administered. |
|
Given By |
Name of the
provider who administered the test. |
|
Date Read |
The date the PPD
test was read. |
|
Measure |
The measurement
(mm) of the reaction to the PPD test. |
|
Result |
Positive (POS),
Negative (NEG), or Not Read (NR) |
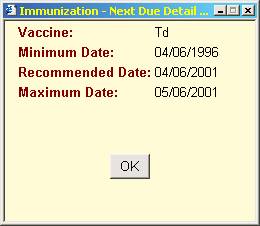
For the Next Due date,
double-clicking will bring up the following fields:
|
Field |
Description |
|
Vaccine |
Abbreviation for
the vaccine type |
|
Minimum Date |
The earliest date
recommended by the TDH Immunizations Division for the next vaccination. |
|
Recommended Date |
The optimal date
recommended by the TDH Immunizations Division for the next vaccination. |
|
Maximum Date |
The latest date
recommended by the TDH Immunizations Division for the next vaccination. |
Next Due Field
The next due field calculates the next due
(recommended date) based on the Recommended Childhood Immunization Schedule for
each tracked family of vaccines.
If the date of service is given before the minimum interval for the next
dose, the service date will appear but there will be no change in the Next Due
calculation. Once all doses for a
vaccine regimen have been given, the Next Due field will disappear for that
vaccine family.
Following are the buttons that can
be accessed from the Immunization Master:
· Add Current (Hot Key = Alt + A)
· Change Current (Hot Key = Alt + C)
· History (Hot Key = Alt + H)
· Save (Hot Key = Alt + S)
· Notes (Hot Key = Alt + N)
· Report (Hot Key = Alt + R)
· Consent (Hot Key = Alt + O)
· Tracking Report (Hot Key = Alt + T)
· Exit (Hot Key = Alt + X)
Brings you to the Immunizations – Add Current screen.
Brings you to the Immunizations – Change Current screen. This button is disabled until the date
of a current (non-history) immunization is highlighted.
Brings you to the Immunization History screen.
Any changes made to the upper
section of the Immunization Master will be
saved.
Brings you to the Immunization Notes screen. If there are notes already existing for
the client, the button will display in blue.
Brings up the client’s Personal Immunization Record, which can be printed for
signature.
Brings up the client’s Immunization Consent Form, which can be printed for
signatures.
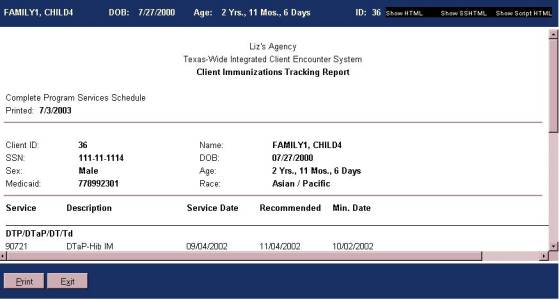
Brings up the client’s Immunization Tracking Report, which lists
immunizations and due dates for immunizations tracked by ImmTrac.
Brings you back to the Selected Client screen.
Personal Immunization Record
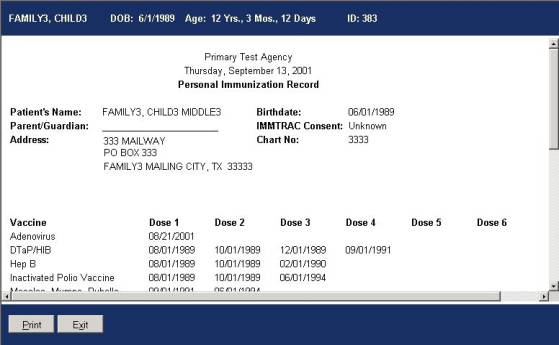
Body of Personal Immunization
Record

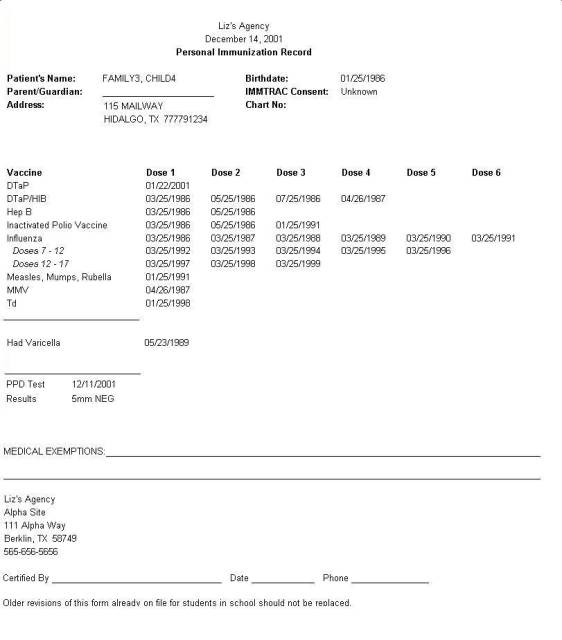
The Personal Immunization Record
lists all the vaccines that the client has received. The upper section of the report includes the client’s name,
address, parent/guardian, date of birth, ImmTrac consent status, and chart
number. The middle section is the
vaccine list. If a client has had
Varicella or has had a PPD test, this will also appear in the report beneath
the vaccine list. In the bottom
section, there is a space to fill in by hand any medical exemptions for the
client. A signature line is there
for the provider’s signature, date of signature, and phone number. The agency name and address is also
displayed.
Immunization Consent Form
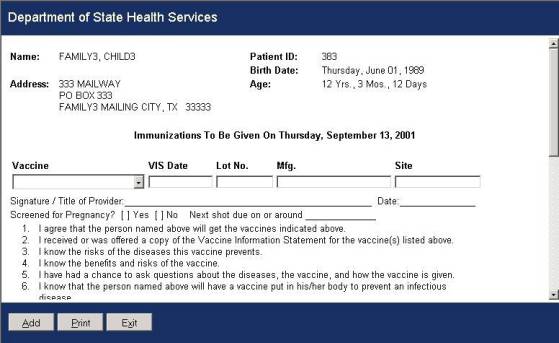
The Immunization Consent Form is
for the client’s parent or legal guardian to sign to authorize the
immunizations given on that day.
The upper section of the form includes the client’s name, address, ID,
date of birth, and age.
If the client has had immunizations
for the current date (today), the above form will appear with the vaccine
fields already filled in with today’s immunizations. The form is ready to be printed out and signed.
However, if the client has not had
immunizations today, the dynamic form shown above will appear. Beneath the upper section is a blank
row with the following fields:
Vaccine (pull-down list), VIS Date, Lot No., Mfg., and Site. Once you fill in the information for
one shot, press the Add button to create a new blank row to be filled in. You can enter as many shots as
necessary and then print the form for the parent’s signature authorizing the
shots and indicating whether the information can be included in the
Immunization Registry.
If the client’s preferred language
is Spanish, either form will be printed in Spanish.
Immunization Tracking Report
Body of Immunization Tracking Report


Adding a Immunization Record
- From the Selected Client screen, select IMMUNIZATIONS.
- Enter in the immunization information into the upper portion of the Immunization Master screen.. Be sure to complete the required fields or you cannot save the record.
- Click the Save command button to save the record.
- Select either Add Current
or History, depending on
whether you are entering current or historical immunizations. If the master record has not yet
been saved, it will be automatically saved when you press either of these
buttons.
- If a client has a reaction to a vaccine for any service date, all
vaccinations given on that date will display the dates in red.
- If more than 5 vaccinations are given for a vaccine family, a
second row for that family (Doses 6-10) will display.