Clients
The Client module allows you to enter, change, and copy
clients in TWICES. It is also the entry
point for the Immunizations
module. You must search for and select
a client before you can access Immunizations.
Objectives
After you complete this section, you will be able to:
- Search for a Client
- Use the Client Search Results Screen.
- Add a Client
- Change a Client
- Copy a Client
- Enter Financial Information for a Client
Client Search
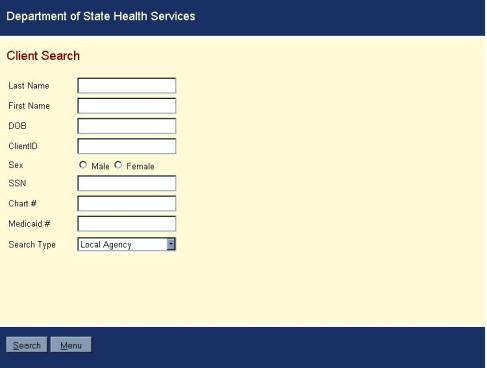
To reduce the occurrence of duplicates, the Client
Search screen forces you to search for clients based on one or more of the
following information points before allowing you to enter in a new client's
information. Search for specific clients by using the search criteria
below.
You must complete at least two of the fields to
perform a client search unless you are searching by Client ID. However,
the more information you provide will tighten the search criteria and will
return fewer clients on the Client Search
Results Screen.
- Last Name
- First Name
- Date of Birth (DOB)
- Client ID
- Sex
- SSN
- Chart #
- Medicaid #
- Search Type [Local Agency (default) or Other Agencies]
To complete a Client Search, you must:
- Enter in the search criteria as mentioned above.
- Select Search - Search will
take you to the Client_Search_Results
screen.
|
Things to Know Before
Searching for A Client |
|||
|
If your search returns more than 100 records, you
will receive an error message asking you to refine your search criteria. This will prevent the web server’s
performance from being compromised by returning too large a record set.
You cannot search with 999999999 for Social
Security Number or with 555555555 for Medicaid Number. You will get an error message. Be careful when searching by Medicaid number or
chart number. These are “exact match”
search fields, which means that the record will not be retrieved unless the
field in the database is identical to what you have entered in the search
screen. For example, if you have a
new client named Alice Bluegown with a chart number of AB1234, it’s possible
that her chart number may not yet have been entered into TWICES. Therefore, when you search with
“Bluegown”, “Alice”, and “AB1234”, you will not retrieve her record because
the chart number field in TWICES is blank.
Blank does not match “AB1234”.
If you are searching with one of these fields and do not retrieve the
desired client, try searching again with only last name and first name to be
sure that the client is not already entered into TWICES. In this way, you will minimize the
possibility of entering a duplicate client. |

From the Client Search screen you can access the
following buttons:
Search (Hot Key = Alt + S) – Takes you to the Client Search
Results screen with the results of your search showing
Menu (Hot Key = Alt + M) – Returns you to the Main Menu
Client
Search Results
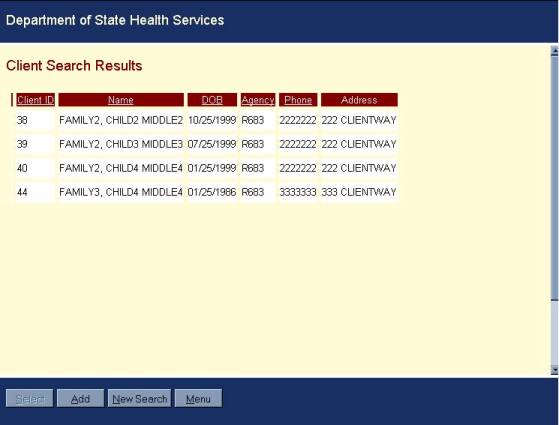
After the Client Search is completed, a listing of the clients that met the criteria will be displayed on the Client Search Results screen. You are able to sort the information by clicking the column headings: Client ID, Name, DOB, Agency, and Phone.
![]() Note: If
no clients meet your search requirements, you will be brought to the Client
Search Results screen with no records showing.
If your search retrieves more than 100 records, you will get an error
message telling you to refine your search criteria.
Note: If
no clients meet your search requirements, you will be brought to the Client
Search Results screen with no records showing.
If your search retrieves more than 100 records, you will get an error
message telling you to refine your search criteria.
From the Client Search Results screen, you are able to access the following buttons:
- Select (Hot Key = Alt + S) – Brings you to the Selected Client screen, a snapshot of information related to the selected client displays to assist you in identifying the client. This button is disabled until a client record is selected. From the Selected Client screen, you are able to access:
|
|
Hint: |
You can also double-click on the row of the desired client to go to the Selected Client screen. |

- Add (Hot Key = Alt + A) – Brings you to the Client Add screen, which adds a client with complete demographic information. From this screen, you are able to access:
- New Search (Hot Key = Alt + N) – Returns you to Client
Search screen
- Menu (Hot
Key = Alt + M) – Returns you to TWICES Main Menu.
Selected Client
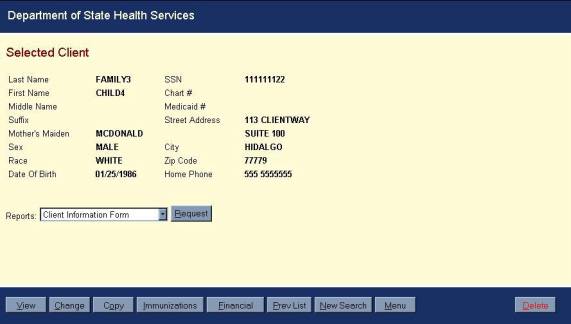
The
following read-only fields are displayed on the Selected Client screen:
|
Field |
Description |
|
Last Name |
Last name of the client |
|
First Name |
First name of the client |
|
Middle Name |
Middle name of the client |
|
Suffix |
A designation that should
follow the client’s name such as Jr., MD, or Ph.D. |
|
Mother’s Maiden |
Maiden name of the
client’s mother |
|
Sex |
Gender of the client |
|
Race |
Race of the client |
|
Date of Birth |
Birth date of the client |
|
SSN |
Social security number of
the client |
|
Chart # |
Chart number assigned to
the client |
|
Medicaid # |
Medicaid number of the
client, if applicable. |
|
Street Address |
Residential address of the
client |
|
City |
City where client resides. |
|
Zip Code |
Zip code where client
resides |
|
Home Phone |
Phone number of client’s
residence |
From
the Selected Client screen, you are able to access the following buttons:
·
View
·
Change
·
Copy
·
Immunizations or Services
·
Financial
·
Prev List
·
New Search
·
Menu
·
Delete (for certain security levels)
·
Request
View (Hot Key = Alt + V)
Brings
you to a read-only version of the Client Add
screen for the selected client.
Change (Hot Key = Alt + C)
Brings
you to a writable version of the Client Add
screen for the selected client. All
fields can be modified.
Copy (Hot Key = Alt + O)
Brings
you to a writable version of the Client
Add screen with a copy of the selected client’s information. You must provide a new Social Security
number. When you save the new client,
the system will issue it a new client ID.
This is useful for entering family members that all have the same last
name and address.
Immunizations (Hot Key = Alt + I)
This
is the entry point for the Immunizations Module. You will be brought to the Immunization
Master page with the selected client’s information showing.
![]() Note: If you
have access to only one program module, this button will show that Module
(i.e., Primary Care, Tuberculosis, etc.) and will take you directly to that
module. The Hot Key for each button will be Alt + the underlined letter. The example shown above is for someone who
only has access to the Immunizations module.
Note: If you
have access to only one program module, this button will show that Module
(i.e., Primary Care, Tuberculosis, etc.) and will take you directly to that
module. The Hot Key for each button will be Alt + the underlined letter. The example shown above is for someone who
only has access to the Immunizations module.
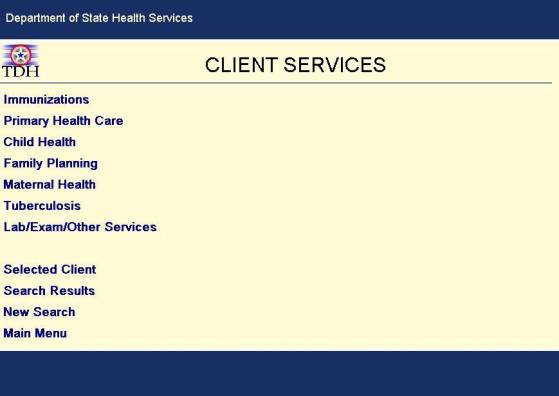
Services (Hot Key
= Alt + S)
If
you have access to more than one program module, the Immunizations button
(shown above) will be replaced by the Services button. This button will bring you to the Services Menu where the modules to which you have
access will be displayed.
Financial (Hot Key = Alt + F)
This
will bring you to the Client Financial page
where you can enter Financial, Billing, and Insurance information for a client.
Prev List (Hot Key = Alt + P)
This
will bring you to the Client Search Results
page with the results of your last client search showing.
New Search (Hot Key = Alt + N)
This
will bring you to the Client Search screen where
you can perform a new search.
Menu (Hot Key = Alt + M)
This
will bring you to the TWICES Main Menu.
Delete (Hot Key = Alt + D)
This
button only appears if you have a security level of 5. This button will delete the selected clients
and all records associated with that client.
Please be very
careful with the use of this button.
Request (Hot Key = Alt + R)
In the center of the Selected Client
screen is the Request button and a pull-down list labeled Reports. Select a report from the list and press
Request, and the report will be brought to the screen where you can read and
print it. Following are the eight
reports available from this list:
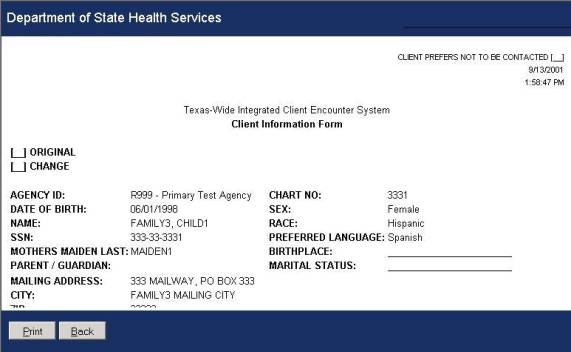
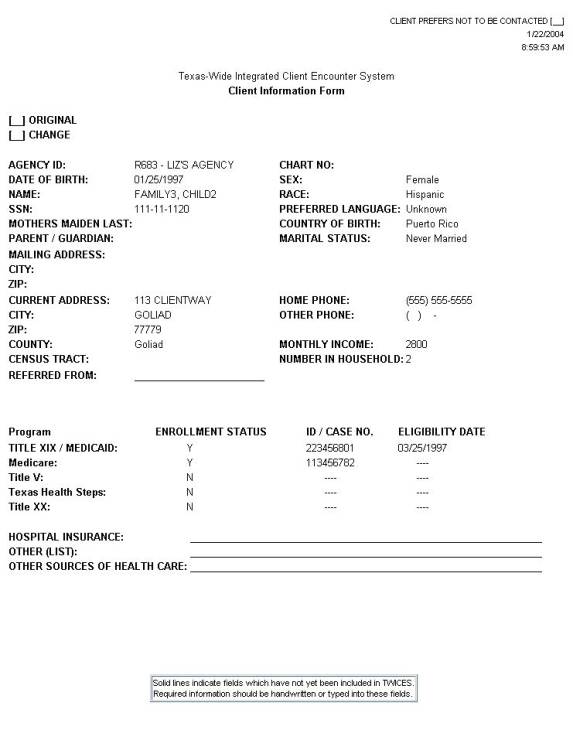
Client
Information Form A report that
includes name, address, and other vital statistics of the client along with
program enrollment information. For
formatting uniformity, each entitlement program listed at the bottom has spaces
for ID/Case No. and Eligibility Date.
When these data are not applicable (such as for Title XX), a dashed line
will appear even though the enrollment status is “Yes”.
Client
Information Form – Full Report

Client
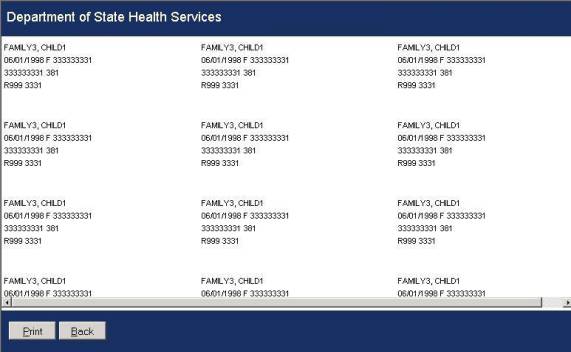
Chart Labels Labels are
produced that include the client’s last name, first name, birth date, gender,
social security number, Medicaid number, client ID, agency ID, and chart
number. These labels can be printed on
standard 1” x 2.75” labels.
Client
Mailing List Labels Labels are
produced that show the client’s name and mailing address. If no mailing address is available, the
residential address will be shown.
These labels can be printed on standard 1” x 2.75” labels.

![]() Note: If you select either mailing labels or chart labels, you
will be prompted for the number of rows you wish to print. You can print up to nine rows.
Note: If you select either mailing labels or chart labels, you
will be prompted for the number of rows you wish to print. You can print up to nine rows.
Client
Services Report This report prints
all the services a client has received within a chosen date range.

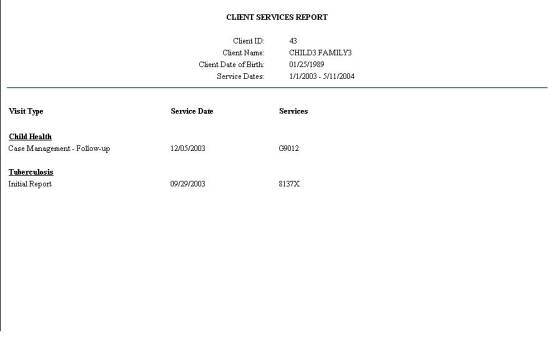
![]() Note: You will be prompted to enter a start date and then
you will be prompted for an end date.
Both dates default to the current date.
Note: You will be prompted to enter a start date and then
you will be prompted for an end date.
Both dates default to the current date.
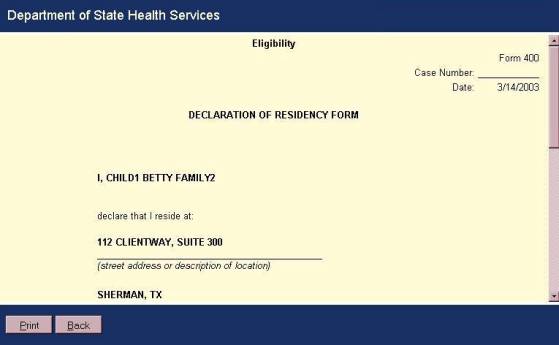
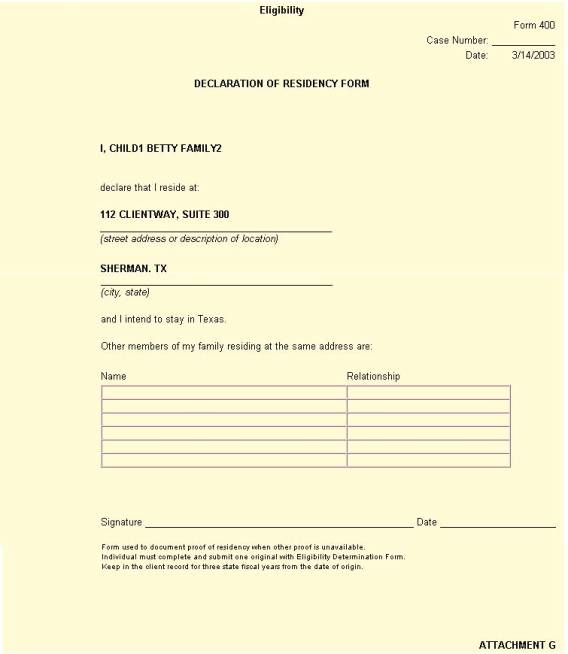
Declaration of Residency Form A declaration of a Texas residence address for the client and his/her family members. If the client’s language is Spanish, this form will be in Spanish.
Declaration
of Residency – Full Report
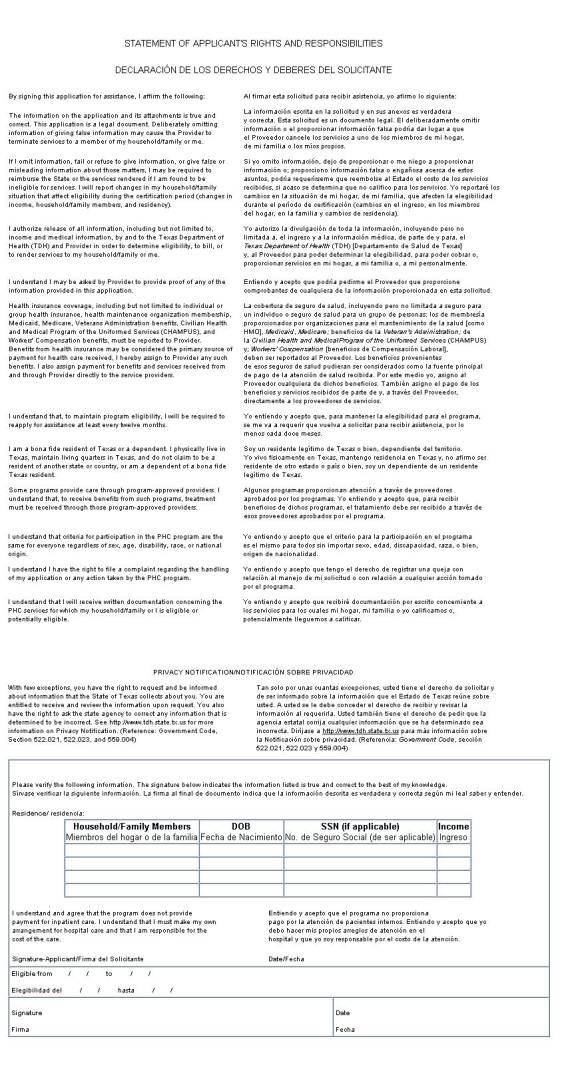
Statement
of Rights and Responsibilities A
document that outlines client responsibility and rights with regard to
eligibility application.
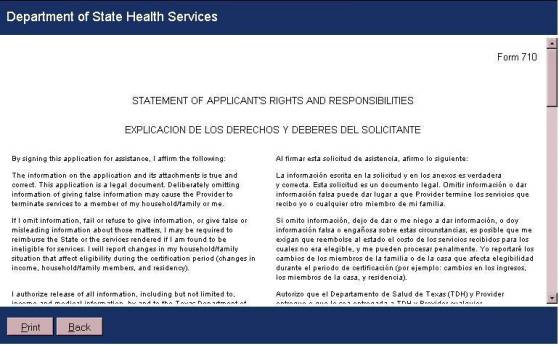
Statement
of Rights and Responsibilities – Full Document

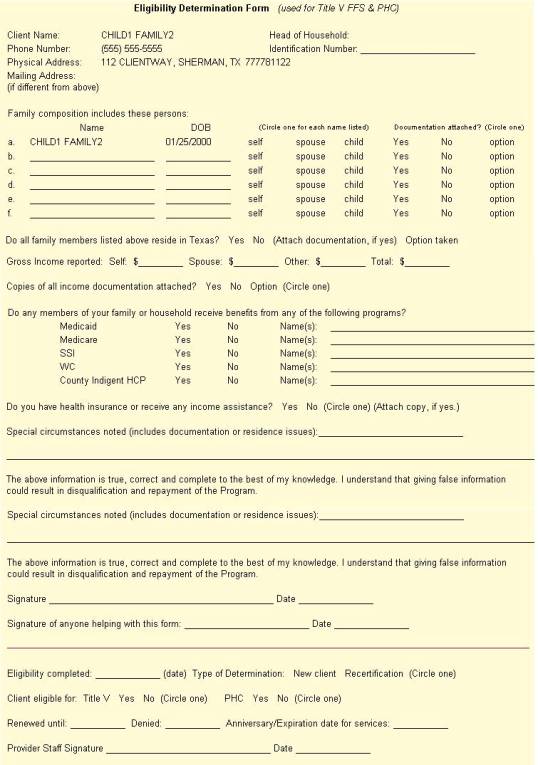
Eligibility Determination Form This form gathers information about the client and his/her family to determine eligibility for Primary Health Care and Title V. It is also available from the Request Reports list on the Primary Health Care Master. If the client’s language is Spanish, this from will be in Spanish.
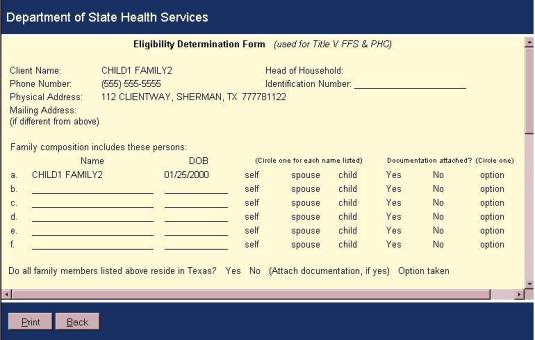
Eligibility
Determination Form – Full Form
Presumptive Eligibility Form This form captures information to determine presumptive eligibility for Primary Health Care if the client does not qualify for Full Eligibility. If the client’s language is Spanish, the form will be in Spanish.
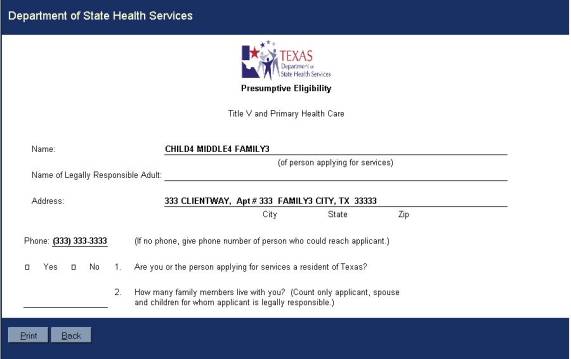
Presumptive
Eligibility Form – Full Form


All eight reports have a Print and a Back button. The Print button will bring up a standard Windows Print dialog box from which you can select your printer and print the report. The Back button will take you back to the Selected Client screen.
Services Menu
|
|
Hint: |
You can press Alt + Q from the Services
Menu in order to access the Code Lookup
screen. |
