Client Add
This section provides an overview of how to use Client Add. Client Add stores detailed information that is used by all the Public Health programs and services in TWICES. This includes demographic information and contact information. Every client receiving services must be entered into Client Add.
Objectives
After you complete this section, you will be able to:
- Understand the sections of client information in the Client Add.
- Understand and use the fields in the Client Add.
- Add a Client.
Client Add
Sections
Client Add is separated into three sections of client information. They include:
From this screen, you are able to access the
following buttons:
Client (Hot Key = Alt + C) takes
you to the Client Section of the Client Add
screen.
Contact (Hot Key = Alt + O) takes
you to the Contact Section of the Client Add
screen.
Notes (Hot Key = Alt + N) takes
you to the Notes Section of the Client Add screen. If notes have already been added for a
client, this button will display in blue.
Save (Hot Key = Alt + S) Saves
all changes and additions and returns you to Selected Client screen.
Exit (Hot Key = Alt + X) Discards
all changes and returns you to Selected
Client screen.
Field Descriptions
Client Section
Fields
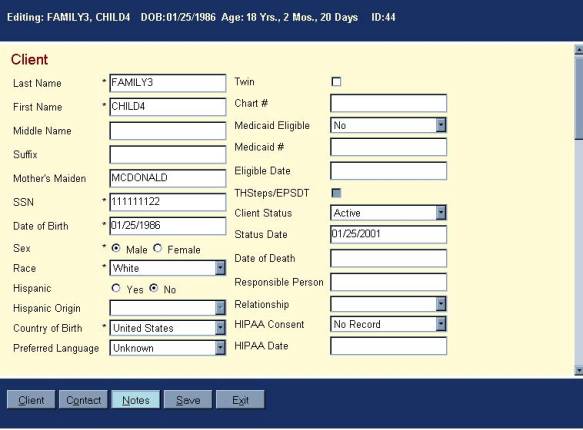
This screen contains the client's basic demographic information.
|
Field |
Description |
|
Last Name |
(Required) Client's last name. The first character must be alphabetic. |
|
First Name |
(Required) Client's first name. The first character must be alphabetic. |
|
Middle Name |
Client's middle name or initial. |
|
Suffix |
Suffix for the client's name, such as Jr., Sr., MD, etc. |
|
Mother's Maiden |
Client's mothers maiden name. The first character must be alphabetic. |
|
SSN |
(Required) Client's Social Security Number (SSN). Must be nine digits. If the SSN is not known, use 999-99-9999. TWICES will display a warning message if a duplicate SSN is used (other than 999-99-9999). |
|
Date of Birth |
(Required) Client's date of birth. Must be after
1/1/1850 and on or before the current date. When updating a client record, if the Date of Birth is increased (making the client younger), you will receive a message stating that this change could impact service records and asking you whether you want to make that change. |
|
Sex |
(Required) Client's gender. Select either Male or Female. |
|
Race |
(Required) Client's race. Select from a pull-down list. Default for the field is Not Specified. |
|
Hispanic |
(Required) Defaults to No. |
|
Hispanic Origin |
(Required if Hispanic is Yes) Client's Hispanic nationality. Select from a pull-down list. |
|
Preferred Language |
Client's preferred language. Select from a pull-down list. Default for the field is English. |
|
Twin |
Check box indicating
whether client is a twin.
Clients who are indicated to be twins will be subject to stricter
matching criteria before being included on a client duplicate report. |
|
Chart # |
Free-form field to note the medical-chart identifier assigned by the clinic. |
|
Medicaid Eligible |
Pull-down list for
Medicaid Eligibility status.
Choices are Yes, No, and Pending. Default is Pending.
Must be set to Yes in order to access the Medicaid number and
eligibility date fields. If
Medicaid Eligible is set to Pending after Medicaid number and date are filled
in, those fields will be grayed but the information retained. If set to No, the fields will be
grayed out and cleared. (Also on Client Financial screen) |
|
Medicaid # |
Number on the client's
Medicaid card. If Medicaid number is not known, leave the field
blank. (Also on Client Financial screen) |
|
Eligible Date |
(Required if
MEDICAID # is filled in)
Medicaid eligibility date taken from the client's Medicaid card. Date must be after 1/1/1990 and
before the current date. This
date should never be more than a year old, so it is a good practice to check
this date at each client visit and update it, if necessary. This field is not accessible until a
Medicaid number is entered. (Also on Client Financial screen) |
|
THSteps/EPSDT |
Checkbox is disabled if
Medicaid is “No”. (Also on Client Financial screen) |
|
Status |
Client's current status in the clinic. Select from a pull-down list. Default for the field is Active. |
|
Status Date |
Automatically filled in with the date when the STATUS is entered or modified. This date can be overwritten. |
|
Date of Death |
(Required if the STATUS shows Deceased) Date of client's death. Date must be on or after client’s birth date and on or before current date. |
|
Responsible Person |
If the client is underage, name of the person who is legally responsible for the client. |
|
Relationship |
(Required if the RESPONSIBLE PERSON is filled in) Relationship between the client and the RESPONSIBLE PERSON. Select from a pull-down list. Default for the field is Other/Unknown. |
|
HIPAA Consent |
Designate whether client signed HIPAA consent
form. Defaults to “No Record”. |
|
HIPAA Date |
(Required if HIPAA Consent is “Refused” or “Signed”) |
Contact
Section Fields

This screen contains the client's addresses and phone numbers.
|
Field |
Description |
|
Home Phone |
Client's home phone number including prefix and area code. Prefix must be 0, 1, or left blank. Area Code must be 3 digits or left blank. Phone number must be 7 digits. |
|
County |
(Required) County where the client lives. Select from a pull-down list. Listing is from the Federal Information Processing System. Default for the field is your clinic’s county. |
|
Residence Address |
Street address where the client lives. There are two text boxes available to accommodate a two-line address. |
|
City |
City where the client lives. |
|
State |
State where the client lives. Default for the field is Texas. |
|
Zip Code |
Zip Code where the client lives. Must be either 5 or 9 digits. |
|
Census Tract |
Census tract where the
client lives. |
|
Alternate Phone |
Alternate phone number for client including prefix and area code. Prefix must be 0,1, or left blank. Area Code must be 3 digits or left blank. Phone number must be 7 digits. |
|
Alternate Phone Location |
Location of the alternate
phone |
|
Mailing Address |
Address where the client
receives mail. There are two
text boxes available to accommodate a two-line address. Hint: You can enter “*” or “Same” and the residential address will be copied into the mailing address fields. |
|
City |
City where the client receives mail. |
|
State |
State where the client receives mail. Default for the field is Texas. |
|
Zip Code |
Zip Code where the client receives mail. Must be either 5 or 9 digits. |
.
Notes Section
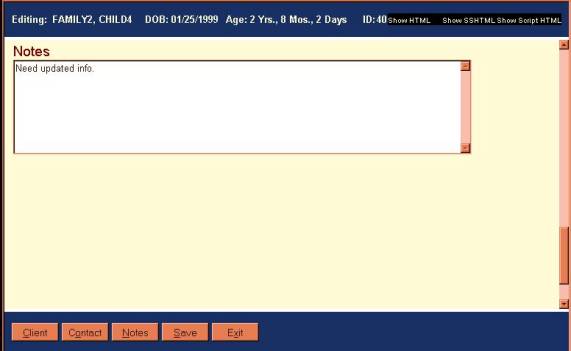
This large text box is available to add any additional information about the client.
Add a Client Using Complete Add
- From the Client Search Results screen, select ADD.
- Enter the client information. Be sure to complete the required fields or you cannot save the record.
- Click the Save command button to save the record. You will return to the Selected Client Screen with the new client information displayed. When you first add a client, the client will not appear in the Previous Search Results list even if the client meets the search parameters. You will need to execute a new search to see the new client in the results list.
![]() Note: If
a client is entered with the same last name, first name, social security
number, and birth date as another client in the database, you will receive a
warning that you may be entering a duplicate client.
Note: If
a client is entered with the same last name, first name, social security
number, and birth date as another client in the database, you will receive a
warning that you may be entering a duplicate client.